Fermentation and Carbonation
It's time for SCIENCE!!!!
At the end of last week's blog, I had just pitched the yeast into the wort. The yeast is the magical ingredient that turns what is essentially sugar water into the nectar of the gods...beer.
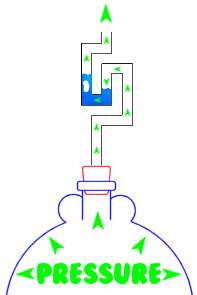 |
| Airlock (Bob the Brewer) |
Yeast is a single-cell organism (1). I like to think of them as tiny little bugs. These bugs' favourite food is sugar. It's how they live and die. These sugar bugs' entire life goal is to go around your beer and eat as much sugar as they can. However, just like humans, when you eat a lot, you get full. When you get full, you have to release some of that waste. Yeast releases two byproducts; carbon dioxide (CO2) and ethyl alcohol (1). The ethyl alcohol is what we are looking for. It's that intoxicating ingredients that make the nights fun and the morning painful. It makes the beer alcoholic. The carbon dioxide is just the yeast burping. We do want our beer to be all bubbly but at this stage, you can't control how much carbon dioxide the yeast gives off. We release the carbon dioxide through an airlock otherwise, instead of getting a beer, we will get a beer bomb from all the pressurized CO2.
If you remember from my previous post, I placed all the cooled wort into a food-safe plastic bucket and pitched in the yeast. This is the last time, we want to introduce both light and oxygen to our beer. These introduce gross flavours into the beer and make it stale. If you don't believe me, pour a beer into a glass and leave it near a window for a day. you won't want to drink it. To avoid this, we add a lid to the bucket. This lid has a small hole in it to add an airlock. The easiest version of an airlock is just a small bubbler. These are filled with a little bit of water. As the CO2 is released, it pushes through the water and out into the air on the outside. Since the pressure, is higher inside the bucket, the air can't get back through the water into the beer.

Thinking of yeast as a creature, we want to make sure it has everything it needs to be happy. Happy, healthy yeast makes great beer. We've given the yeast lots of sugary food from the boil. We've sealed it off from the outside elements in our bucket. The final thing that we need to do is make sure the yeast is at a good temperature. Different beer yeasts like different temperatures but for our recipe, the US-05 yeast likes to be happy between 18-26℃ (2). Something to keep in mind is that as the yeast eats all the sugar and gives off CO2 and ethyl alcohol, that reaction creates heat itself. So the yeast is going to act as its own heat source because...SCIENCE! For this reason, we want to keep the yeast on the lower end of this range. Luckily, an Ontario basement in January is the perfect temperature for fermenting beer. With the yeast having everything it needs to be happy, the next step is the hardest part of brewing...waiting. The wort will take about 2 weeks to fully ferment and turn into beer. After a day or two, you start to see bubbles of CO2 being released from the airlock. This was very exciting to see because it was proof that the yeast was working its magic.
After a long two weeks of waiting, I was able to test my beer with the hydrometer that I used at the end of the brew and before fermentation. The reading went from an original gravity of 1.056 to a final gravity of 1.011. The scale for these measurements has no units but 1.000 would be distilled water. I could punch those values into an online ABV calculator to see that my final ABV was 6.2% which is right about where I was aiming.
 |
| Beer kegged (Ustrzycki©2023) |
1. Palmer, J. J. (2017). How to brew: Everything you need to know to brew great beer every time. Brewers Publications, a division of the Brewers Association.
2. Safale™ US-05. Fermentis. (2022, March 23). Retrieved February 1, 2023, from https://fermentis.com/en/product/safale-us-05/

Comments
Post a Comment